But over the due course of time, OEMs started pouring these features into their OS skin itself. This, when coupled with the fact that rooting tends to bring in more caveats than ever before, resulted in the framework going into oblivion. However, for tech enthusiasts, while this might be the road less traveled and filled up with roadblocks, but it is a journey worth craving for. So on that optimistic note, let’s get started with the steps to install Xposed Framework/LSPosed on your device running Android 13.
Install ‘Zygisk’ Xposed Framework/LSPosed on Android 13 [NEW]
This is the newer method to install Xposed Framework/LSPosed on your Android 13 device. Instead of using Riru, we will now be using the Zygisk environment. Apart from that, the entire installation process has been significantly simplified by the developers, with the APK & ZIP file being merged into one single package. So without any further ado, let’s get started. The below instructions are listed under separate sections for ease of understanding. Make sure to follow the same sequence as mentioned. Droidwin and its members wouldn’t be held responsible in case of a thermonuclear war, your alarm doesn’t wake you up, or if anything happens to your device and data by performing the below steps.
STEP 1: Root your Android 13 Device
First and foremost, your device needs to be rooted via Magisk. if you haven’t done so yet, then please refer to our guide on How to Root Android 13 via Magisk Patched Boot.
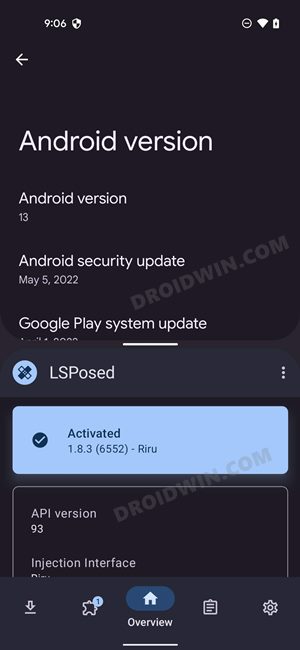
STEP 2: Enable Zygisk
STEP 3: Download Zygisk LSPosed Xposed Framework
STEP 4: Install Zygisk LSPosed Xposed Framework on Android 13
That’s it. This was the new method to install LSPosed Xposed Framework on your Android 13 device. You may now skip the old method listed below and directly head over to the steps to flash modules.
Install ‘Riru’ Xposed Framework/LSPosed on Android 13 [OLD]
The below instructions are listed under separate sections for ease of understanding. Make sure to follow the same sequence as mentioned. Droidwin and its members wouldn’t be held responsible in case of a thermonuclear war, your alarm doesn’t wake you up, or if anything happens to your device and data by performing the below steps.
STEP 1: Root your Android 13 Device
First and foremost, your device needs to be rooted via Magisk. if you haven’t done so yet, then please refer to our guide on How to Root Android 13 via Magisk Patched Boot.
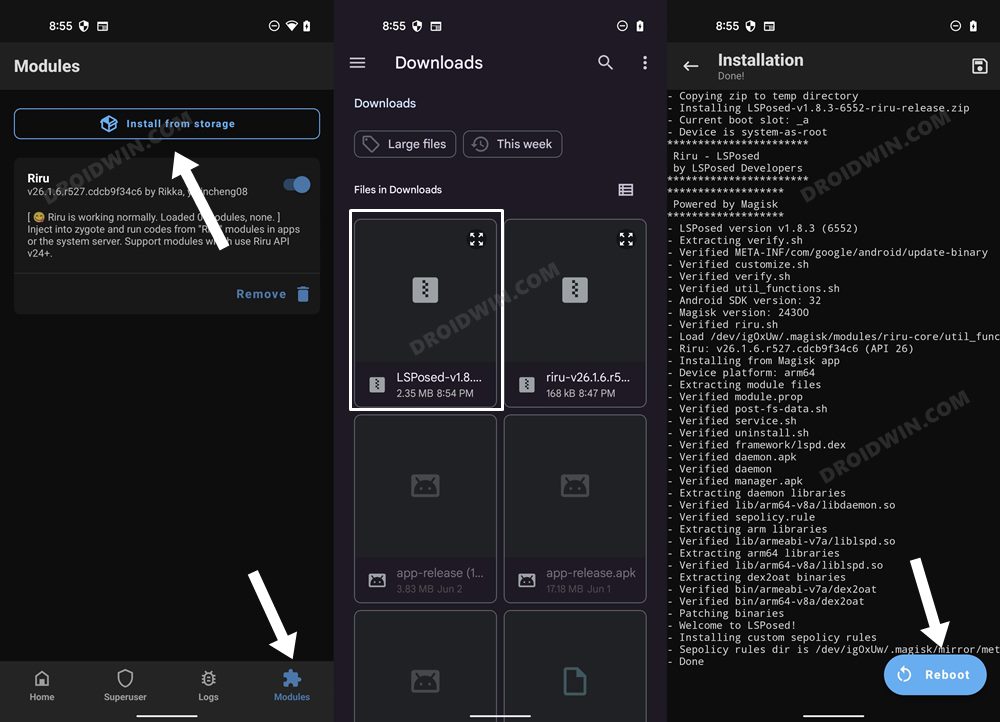
STEP 2: Download Riru and LSposed Modules
Next up, let’s get hold of the two main modules- Riru and LSposed. As far as the latter is concerned, we have given it preference over EdXposed as it doesn’t fail the SafetyNet. Moreover, it is more actively supported and in use than its counterpart EdXposed.
Riru Module: GitHub Download LinkLSposed Module: GitHub Download Link
NOTE: If you have Zygisk enabled in Magisk, then download the Zygisk version of LSposed, otherwise, download the RIRU build. [You could also install the RIRU version on your device that has Zygisk, but you will then have to disable Zygisk from Magisk > Settings].
STEP 3: Install Riru and LSposed Modules
STEP 4: Install LSposed Manager
This is the app that will provide us with the working environment from where you could download, enable and disable the desired modules. So let’s install it onto your device as well. That’s it. These were the steps to install Xposed Framework/LSPosed on your Android 13 device. Let’s now show you the steps to install, disable, and uninstall modules. Follow along.
How to Install Xposed Framework/LSPosed Modules
How to Disable Xposed Framework and Modules
How to Uninstall Xposed Framework
Fix Bootloop/Soft-Brick After Installing Xposed Framework
If your device is in a continuous bootloop or has been soft-bricked after installing Xposed, then you may refer to our below-linked guides to fix this issue:
Fix Magisk Module Bootloop without TWRP RecoveryHow to Uninstall Magisk Modules using TWRP RecoveryHow to Fix Magisk Bootloop using TWRP Recovery [2 Methods]
So with this, we round off the guide on how you could install Xposed Framework on your device running Android 13. If you have any queries concerning the aforementioned steps, do let us know in the comments. We will get back to you with a solution at the earliest.
About Chief Editor